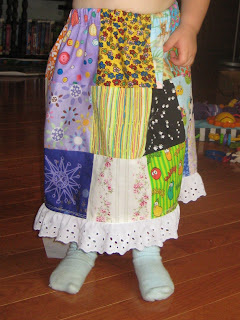
YOU WILL NEED:
Cotton fabric -- how much depends on skirt size -- see below
3/4" elastic -- length depends on skirt size
White eyelet -- length depends on skirt size
Scissors
Thread
Needle
Iron
Pins
Big safety pin
Paper
Ruler
Measuring tape
You will use rectangles of fabric for the top row and squares for the rest of the rows. The rectangles will get folded down to make the waist where the elastic goes, so they'll end up looking like a square when the skirt is finished.
SIZING:
Here's how many pieces I used for different sizes:
- Birth-12 months: 8 rectangles (4"x 6") and 8 squares (4" x 4") (two rows of 8)
- 2T-3T: 8 rectangles (5" x 7") and 8 squares (5" x 5") (two rows of 8)
- Age 6-8: 9 rectangles (5" x 7") and 18 squares (5" x 5") (three rows of 9)
- Age 9-11: 10 rectangles (5" x 7") and 30 squares (5" x 5") (four rows of 10)
Those are the four sizes I used, so if you want a size other than that, you can follow this formula:
Girl's waist in inches times 1.5 divided by 4 = how many pieces you need for each row.
OR
Baby's waist in inches times 1.5 divided by 3 = how many pieces you'll need for each row.
This probably won't be a whole number, so just round up to the next number. For example:
19 x 1.5 = 28.5 and then 28.5 / 4 = 7.125 so you'd round up to 8 and use 8 squares per row.
Okay, enough math. If you're confused, leave me a comment on this page, and I'll try to help.
INSTRUCTIONS:
Step 1. Once you've done your measuring (or followed the sizes I used) and figured out how many pieces you'll need, cut them out. Remember, you need one row of rectangles for the top, and then enough squares for how ever many rows under that you want. I made a pattern out of plain white printer paper for each size and pinned those to the fabric to cut around. The rectangles will be sewn together along their long sides, so cut them accordingly so your fabric patterns won't be upside down or anything. See image below Step 2 if that confuses you.
Step 2. Sew your pieces together, right-side to right-side, in long rows. Leave 1/2" seam allowance. One row of rectangles for the top row, and then however many other rows you're doing, depending on the length you want this skirt to be. Here are three finished rows, eight pieces each, though you can't see all of them, lol:
 |
| Right Side |
 |
| Wrong side |
Step 3. Iron the backs of these strips so the seams are open, like this:
Step 4. Sew the long side of your strips together, right-side to right-side, leaving a 1/2" seam allowance again. Now would be a good time to measure what you've finished to make sure it will make a long- and wide-enough skirt.
Step 5. Iron the back again, this time the long seams you just finished sewing. Also fold over the top and bottom hems 1/2" and iron those so they'll be easier to sew.
Step 6. Sew the top and bottom hems.
Step 7. Measure your eyelet and sew it to the wrong side of the bottom hem. It should look like this when you're done:
 |
| Right Side |
 |
| Wrong Side |
Step 8. Iron down the top hem a little more than 3/4" inch all the way along. Make sure your elastic fits through this space. This will be your waistband.
Step 9. Sew up the back seam, right-side to right-side, creating a sort of big fabric tube. Unfold that last bit of ironing before you do this, and make sure your seam goes all the way from the top of the fabric down to the end of the eyelet.
Step 10. Wrong side out still, fold down that 3/4"+ waistband part you ironed along the top. Sew this, leaving about a 2" gap where you did the back seam. It should look like this:
 |
| Wrong side, sewed down |
 |
| Wrong side, gap left at back seam |
Step 11. Cut a piece of elastic 1" shorter than the waist of the girl you're making this skirt for.
Step 12. Insert your elastic into the gap you left in the waistband. Attach a big safety pin to the lead end so you can slide it through the whole waistband.
Step 13. Sew elastic together, overlapping by 1". I recommend doing this by hand, and sewing all the way around the 1" rectangle of overlap.
Step 14. Sew closed the gap you left in the waistband. I also recommend doing this by hand.
Step 15. Shift the fabric along the elastic until it's evenly distributed.
Wear!
These can be machine washed and dried, though I recommend a gentler cycle.


Awesome, Rachel! I'm very impressed. I KNOW I didn't teach you how to do any of this!
ReplyDeleteLol, are you mad? You taught me to do all of that! Hand sewing, machine sewing, ironing, using a safety pin to put elastic in a waistband -- all you! I just put it all together, is all.
Delete